Categories
Let's talk about Cloud Microsoft for Organisations

Azure compliance and cloud governance

As organizations migrate to the cloud, there can be a lot of
confusion and misconceptions. Cloud governance and compliance
is all about a set of rules that you need to comply with while you are creating, migrating, or managing resources in the cloud.

These rules vary from organization to organization. For example, a government organization may have strict rules that they need to follow when they run a business in the cloud. On the other hand, a private
company will have liberal rules compared to the government one.

Ideally, these rules are no different than the ones you have on-premises;
the only difference is that in the cloud you will be using Microsoft Azure as the platform instead of your on-premises servers.

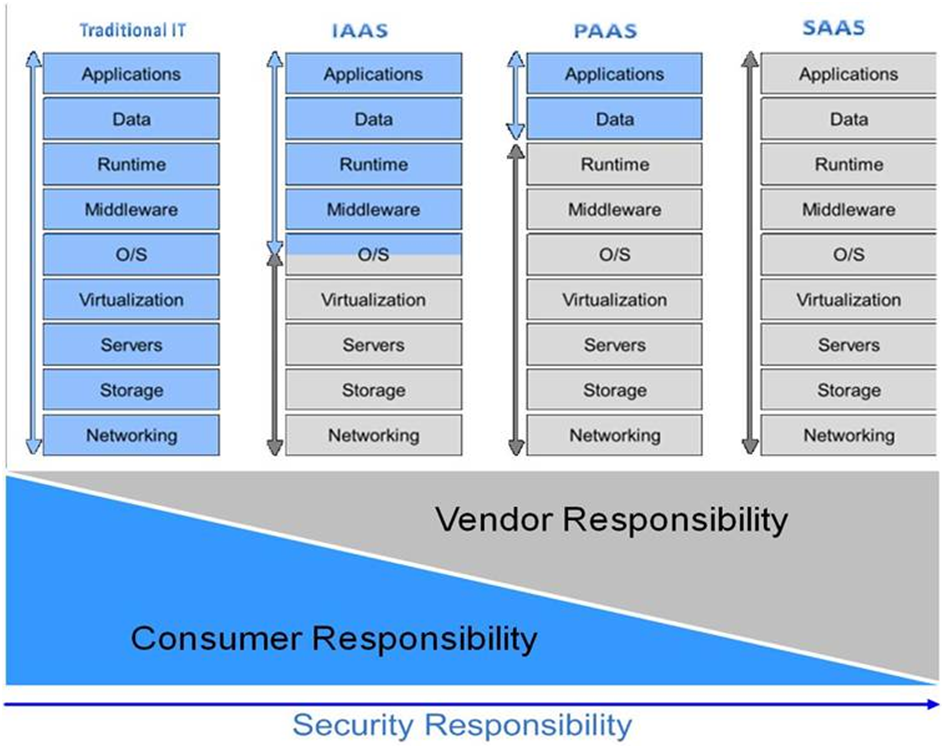
A lack of rules or controls will create issues with your data privacy, security, and cost, as well as efficiency. With on-premises, you controlled the entire infrastructure, and the perimeter was secured using firewalls and other security devices. In the cloud, you won’t have complete control over the network, so you need to be aware of the vulnerabilities and the
best practices or offerings provided by Azure to resolve them.

Common rules that are followed in organizations are related to data residency, compliance policies like PCI-DSS if you are dealing with customer credit card information, budgeting for cost optimization, and security services to ensure that there are no vulnerabilities that
can be exploited by hackers.

Compliance and governance cannot be achieved in a single day;
This is a continuous process. The policies and procedures need to be tweaked and evolved as you notice room for improvement. Also, sometimes you need to expand the rules to accommodate
new services. Concisely, cloud compliance is all about setting up rules by which you will be continuously monitoring and amending relevant controls for cost optimization, improving efficiency, and eradicating security risks.
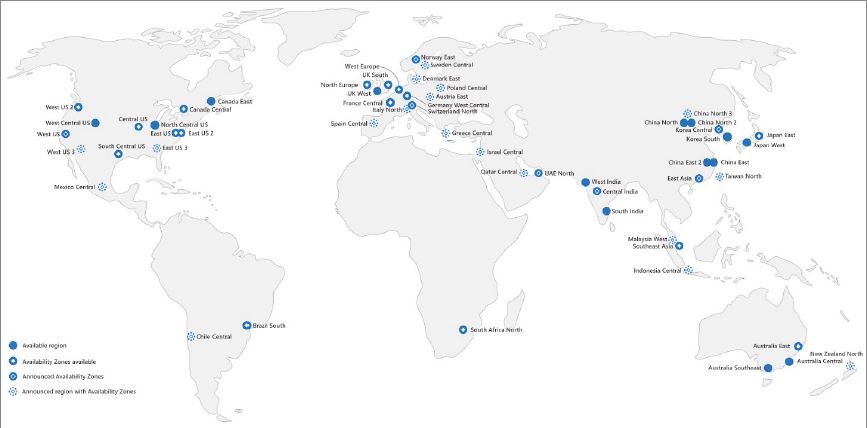
Azure Regions

Microsoft Azure comprises data centers that are located across the globe. Currently Azure has more than 60 regions, and there are more in the pipeline.
This global presence makes Azure the cloud provider with the highest number of regions.

Also, this omnipresence gives customers the ability to choose the regions that are right for them. If you are wondering what an Azure region is, a region is a geographical area on the planet comprising at least one data center, but usually multiple. The data centers are isolated
from each other in close proximity and connected to each other via low-latency networks, enabling faster and seamless communication.
East US, Brazil South, UK South, India West, and Australia Central are some examples of Azure regions.

  • Regions offer flexibility for customers to deploy resources to regions that are close to their customers.
  • Regions ensure data residency for customers.
  • Regions offer compliance and resiliency options.
  • When you deploy a resource in Azure, in most cases you will be asked to choose a region.
  • Certain services are region specific, and the availability is limited to some regions when they are launched. Gradually, Microsoft will expand the service to other regions.
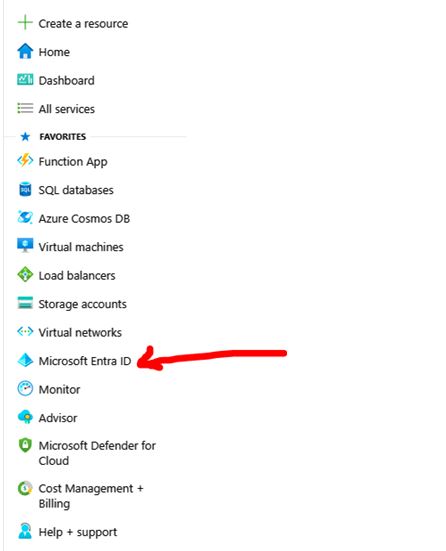
  • Services like Azure AD, Azure Traffic Manager, and Azure DNS do not require a region.
  • The region for these resources will be shown as Global in the Azure portal.
  • Each Azure region is paired with another region within the same geography to form regional pairs.

Regional Pairs

Each region consists of one or more data centers that are in close
proximity and connected via a low-latency network.

Now, an Azure geography is defined as an area of the world that consists of one or more Azure regions. Some examples are United States, India, Asia Pacific, United Kingdom, etc. If we take the United States geography, it consists of several regions such as East US, West US, Central US, etc. So, an Azure geography ensures the data residency and compliance requirements are met.

If you are an organization working with a US government organization, then you cannot store data outside of the United States. Similarly, the European Union has the General Data Protection Regulation
(GDPR) where organizations cannot store personal data of the EU citizens outside EU member states. If your organization is GDPR compliant, you can pick a geography that is within the EU and stay compliant.
Azure pairs one region with another region within the same geography. Regional pairs play a vital role in business continuity and disaster recovery (BCDR). Whenever there is a planned update on the Azure platform, Azure rolls out the update sequentially across regional pairs. This guarantees that only one region in the regional pair is updated at a time
and the other one can be leveraged for the recovery of the services if something goes wrong.

Categories
Let's talk about Cloud Microsoft for Organisations

What is Azure join?


Single sign-on(SSO), is one of the features offered by Azure Directory. You can use SSO on devices, apps, and services from anywhere in the world.

Joining devices to Azure AD assures the corporate devices are protected and that they follow the compliance standards set by the organization.
Users can bring their own devices and join them to Azure Directory and administrators make sure that these devices also follow the standards of your organization.

Let’s have a look at the benefits of Azure AD Join.
Azure AD Join has the following benefits:

Single Sign-On; This is the primary feature of AD Join; you can sign-in
to any of your applications and services without a username and password prompt. The best part is that, is not necessary to connect to the domain network to use SSO.

Enterprise Client Roaming ; The settings are synchronized across devices that are joined to Azure AD.

Microsoft Store for Business; Joining your device and signing-in
to the store with work or school accounts gives you a customized catalog of applications that are shared by your organization.

Windows Hello; This provides you with biometric authentication using facial recognition or fingerprints to access corporate resources and sign-in to devices. The devices should have hardware that supports Windows Hello to use this feature.

Block Access Administrators can enforce policies and devices that do not meet the requirements can be easily blocked.
Let’s see what connection options are offered by Azure AD Join.

Connection Options
You can connect your devices to Azure AD using the two following options:


1)Register your device to Azure Directory Registration creates an identity for the device, and this identity can be used for authentication. Whenever a user signs in, the identity of the device can be used for authentication. Administrators have the right to enable or disable this identity.


2)Join your device to Azure Directory Joining your device provides the same features as registration and additionally changes the local state of the device. With a change of local state, users can sign in to their device using their work or school account. Joining is more like an extension to the registration process.

Combining the registration process with Microsoft Intune (mobile device management [MDM] solution) will help you create conditional policies using the device attribute. Using this combo, you can block devices that do not follow the organizational compliance standards.

For example, you could block all devices that are using Windows XP
or Windows 7 and make Windows 10 the prerequisite for accessing corporate resources.
You could join your device to Azure AD by going to your Windows 10

Settings ➢Accounts ➢ Access To Work Or School. Signing in with your work or school account will connect your device to the Azure AD domain, and you can sign in to corporate resources
using SSO.

All the devices that are connected to Azure AD can be explored from the Azure Directory ➢ Devices blade.

This blade will show OS information, OS version, join type, and
owner of the devices that are joined.

Categories
Let's talk about Cloud Microsoft for Organisations

What are Azure Directory roles??


Azure Directory roles are used to manage the permissions that can be assigned to users. You can assign roles to users so they can perform certain actions such as resetting user passwords, assigning, or removing licenses, adding or removing users, etc.
More than 50+ built-in roles are available in Azure Directory so you can follow the principle of least privilege and assign users the permission that they need to complete the tasks given to them.

Azure Directory roles make sure that the users are not over-privileged
or under-privileged with the permissions given to them. For example, if you want to give a user the permission to create/manage groups, create/manage groups settings such as naming and expiration policies,
and view groups activity and audit reports, then Groups Administrator is the right role that can be assigned to the user.

Categories
Let's talk about Cloud Microsoft for Organisations

Group Accounts

When it comes to access management, applying permissions or roles to each user one by one is cumbersome, so to solve this complexity, we have groups in Azure Directory.

We can group users to create group accounts and then apply the permissions or roles to the group so that all members of the group get that access.

Group accounts make access management easier. You can also synchronize groups from on-premises to the cloud, the same as with users.
Azure Directory allows you to create two types of groups,

1)Security Groups and

2)Microsoft 365

Let’s understand the differences between these types.
Security Groups play an inevitable role in access management. Security groups can be used to control access to resources easily. For instance, you can create a security group called HumanRes1 and give access to all HumanRes1-related resources. As an administrator, the advantage here is that you do not have to manage individual access; this can be controlled at the group level. Security groups require the Azure Directory Administrator role to perform management actions.

The other group is Microsoft 365. Microsoft 365 groups serve the same purpose as security groups; however, they provide additional capabilities such as access to a shared mailbox, shared calendar, SharePoint, and more. You can extend the collaboration and provide access to external users as well.

Unlike security groups, both users and admins can use Microsoft 365 groups. Another point to understand here is about membership to groups. You can add users as well as groups (nested groups) to a group as members. The rights can be accessed in three diverse ways, as follows:
1)Assigned This one is straightforward; this will let you add users (or groups) to the group as members. This type of addition is also known as direct membership.
2)Dynamic User Group memberships are controlled using member attributes; using them we can dynamically add or remove users from a group.

For example, you can have a rule like if the department of a user is HumanRes1, then that user should be added to the group HumanRes1.
Here Azure constantly reviews user attributes. If a new user is added with the department as HumanRes1, then Azure will add that user to the HumanRes1 group. Similarly, when someone leaves the department, Azure automatically removes the user from the group. This is especially useful
for administrators, as they do not have to remove or add access whenever a new user is added or removed; but they must make sure that the attributes are added to the user correctly.

3)Dynamic Device group; This is applicable only in the case of security groups and is like the dynamic user concept. The primary difference is that instead of looking at the user attributes, here you are looking at the device attributes. You can register or join your devices to Azure directory, and based on the device attributes, the group membership can be judged and controlled.

Viewing Groups in Azure AD

To view and manage groups direct yourself to the Azure portal to
reach the Azure Directory blade. Right below the Users option that we used earlier, you will be able to see Groups. Clicking Groups will take you to All Groups.

Let’s go to add a new security group and Microsoft 365 group. In addition of this we will see how you can work with dynamic rules and direct membership to these groups. We will create a security group called
Mateo’s group and add the users we created earlier via direct membership.

Adding Security Groups to Azure AD

  1. Navigate to the Groups blade by following the steps below
    you will be able to see New Groups option.
  1. Since our first task is to create a security group, you can see that we have selected the
    following options:
    a. Group type: Security (as we need to create a security group).
    b. Group name: Mateo’s security group
    c. Group description: This field is optional; if you need to add a description about the
    group, feel free to add it.
    d. Azure directory roles can be assigned to this group: this setting needs to be enabled if you plan to assign roles to this group from an access management perspective.
    e. Membership type: Assigned (as we are going to perform direct assignment). Owners: You can select the owners for the group. This set of users will manage the group such as adding or removing users. You can search users, and add once you are done, click Select.

The new group window will now show the number of users you selected as owners and members. The next step is to click Create and create the group.

With this action we have seen how to create security groups on Azure.

Categories
Let's talk about Cloud Microsoft for Organisations

How to invite new users being part of your new project on Azure directory.


In the “Adding Users” post, we discussed several types of users. If you recall, we talked about Guest accounts (Microsoft accounts and users from external Azure ADs). These users need to be invited to your tenant. Recipients can redeem the invitation and join your tenant
for collaboration.
In the All Users blade, you have an option to add a new Guest user. Clicking New Guest User will redirect you to a screen similar to the screen shot below.

The only email address is the mandatory field, and you can even customize the personalized message. By clicking Submit, this message will be appended to the email invitation, which will be triggered to the recipient, as shown


A sample invitation has been added for your reference as the above screenshot.
These users can be easily spotted in the All Users blade by looking at the User Type column. You can further add a filter in the blade users in your tenant.

With this example we have invited guest user being part of our new project on Azure.

Basic administrative tasks are limited not only to user management but can include group management as well. In the next post, we will see about what group accounts are and how to create them in Azure directory.

Categories
Let's talk about Cloud Microsoft for Organisations

How to delete users and modify their settings.

As mentioned in the previous blog post, whenever someone gets promoted, moves to a different department, or changes their work location, these details need to be updated on the user profile.

Though these fields are not mandatory, they will be important in understanding more details about the user. Assume that there are two John Wells in your organization—one works for HR and the other one works for IT. Adding department details here will help the administrator to perform the operations on the right user.

In the next example we are going to modify the user settings we created previously and then delete the user.

Let’s perform the update process on the user we created in the previously. The tasks that we are going to perform here are as follows:

■ Reset the password of the user to a new password.
■ Change the department of the user to HR.
■ Add the employee ID as 1322.
■ Verify the user details.
■ Delete the user.
The first step here is to navigate to the All Users blade as we have done in the last post.

You can follow these steps to update the user attributes:

  1. From the All Users blade, select the user Mateo by clicking the name; that will take you to a screen similar to the following one.

Since our first task here is to reset the password, you can click Reset Password, and you will be asked to confirm whether you want to proceed with the reset process. You must click again the Reset Password option, which will be visible in the center top of the screen. To reset a user’s password, you need to be the Global Administrator.

User Administrators, Help-desk Administrators, and Password Administrators can also reset the passwords of non-administrative
accounts. However, User Administrators, Help-desk Administrators, and Password Administrators cannot reset the password of a
Global Administrator.

Password reset of the Global Administrator can be done only by
another Global Administrator.

Confirming the reset password option will display a temporary password on the screen.
This needs to be changed on the first sign-in after the reset as this is a temporary password and an administrator is responsible for sending this password securely to the user.

Now that you have reset the password, the next task is to update the department and employee ID.

To edit the user details, you can click the Edit properties button, which is on the left side of the Reset Password button.

Clicking the Edit button will enable all the text boxes. Once you have updated the information, you can click Save. You can update all information except the object ID, which is a unique ID assigned to every identity by Azure Identity Management.

Let’s go back to our previous page and click the edit button.

After saving the details, if you go back to user profile, you will be able to see that all the data you entered is populated to the user profile.

Performing these tasks one by one from the portal is not a great idea if you
have a large user base. All the actions that you have seen in the previous example can be performed in bulk. In the next section, let’s how administrators can leverage bulk operations available for user accounts.

Bulk Operations
In an enterprise environment, new users are added, updated, or deleted in bulk. Performing these actions one by one for each user is a hectic task, and there is a higher chance of human error. You need to automate these tasks and should be able to perform these tasks in bulk.
Azure Identity Directory provides bulk operations by which you can create, invite (for guest users), delete, and download users in your directory.

These bulk actions are achieved via uploading a CSV template file, which means a Comma-Separated Values file, which allows data to be saved in a tabular format and contains the details of each user. This file template will be available for download from Azure Portal itself.

In the next exercise, you will use a bulk operation to create nine users (all Avengers characters) in a single shot, and once they are visible on the portal, you will perform a bulk delete operation.

Navigate to the All Users blade.

Select Bulk Operations and then select Bulk Create. Selecting Bulk Create will let you download a CSV template. You need to download the
template, fill in the details, and upload it to Azure AD for processing. Azure will prompt you with the steps.

Once the file is downloaded, you can open it in Microsoft Excel and fill in the details.
The headers will be auto populated; some of them are required, while some other are optional. The fields that are required will have a [Required] tag in the header. The required fields are Name, Username, Initial Password, and Block Sign In. Fill in the template, as shown here.

Categories
Let's talk about Cloud Microsoft for Organisations

Users and Groups in Azure Directory

Users and groups are the primary objects of every Identity Access Management solution, and Azure Microsoft Entra also has a user and group management system, which is the backbone for the access management of identities in the Azure Cloud.

You have seen what an account is; just to refresh what we discussed; an account is an identity that has data associated to it. In Azure Microsoft Entra, you have user accounts and group accounts for managing users and groups. Let’s get started with user accounts and see the operations that are available for administrators.

User Accounts

As the name suggests, user accounts consist of user identities, which will be used by users to log in to services such as Azure, O365, Dynamics 365, SaaS applications, and other third-party applications that are integrated with Microsoft Entra.

Viewing User Accounts

As an administrator, you will be asked to verify if the account exists in Azure Microsoft Entra or get information about a particular user. Hence, knowing how to view user accounts is particularly important in an IT admin’s daily job.

Let’s follow a step-by-step process to view the users in your directory.

1) Open your browser (Microsoft recommends that you use the latest version of your favourite browser) and navigate to the Azure portal, which is available at https://portal.azure.com.

2) A sign-in screen will be presented to you. Sign in using the email address that you used to create the subscription. The data you enter (username and password) will be sent to Azure Microsoft Entra. If the credentials are correct, then you will be logged in.

3) Now that you are in the Azure portal, you can click the hamburger icon at the top-left corner and click Azure Microsoft Entra Directory.

Selecting Microsoft Entra will take you to the Overview blade of Azure Active Directory. This blade gives you some idea about certain aspects of your Azure AD such as the tenant ID, tenant name, primary domain associated to your tenant, edition of Azure AD, and number of users, groups, applications, and devices.

If you scroll down, you will see more information such as your account, Azure AD connect, secure score,etc. The graphic here shows the overview of the tenant that is used for the demonstration.

If you take a close look at the graphic, you can see at the top the option that will let you create, manage, and delete tenants.

These options are quite useful if you are managing a multi-tenant environment. One thing to note here is that deleting a tenant requires you to cancel all active Azure subscriptions that are part of the tenant.

You cannot delete a tenant when there is an active Azure subscription associated with that tenant. Since we are working on user management, let’s shift our focus to the Users blade under the Manage section.

Once you click the Users blade, you will be presented with the All Users view. Your view might be different from what is shown here as it is displaying the users in the demo tenant.

Adding Users

In an enterprise environment, user insertion happens frequently, and cloud administrators are responsible for this. Whenever a new employee joins the organization, administrators are required to create their account, add the necessary licenses, complete their profile, set up their initial password, etc.

There are 3 types of users in Azure AD.

Cloud Identities As the name implies, these are identities that are created in Azure AD and exist only in Azure AD. In the upcoming example, we are going to create a user called John Reed in Azure AD.

This user is going to be a cloud identity as the user will exist only in Azure AD.

Another point to note here is that the user can be part of another Azure AD as in an Azure AD of another organization.

For instance, assume that there is a company abc.onmicrosoft.com with a user called Jane Michael.

Jane Michael can be added to another company’s Azure AD, say, xyz.onmicrosoft.com, through an invitation process also known as business-to-business collaboration.

In this case, Jane Michael is a cloud identity of abc.onmicrosoft.com and she is added to xyz.onmicrosoft.com for collaboration.

When Jane’s account is deleted from her primary directory (abc.onmicrosoft.com), her presence in the other directory is not automatically removed; we have to perform this action manually.

Directory Synchronized Identities

As mentioned earlier, one of the features in Azure AD is that you can synchronize your on-premises Active Directory to Azure AD.

If you have an identity that is synchronized, then you will see Yes in the Directory Synced column for the user in the All Users view.

As mentioned earlier, one of the features in Azure AD is that you can synchronize your on-premises Active Directory to Azure AD.

Guest Users

These are accounts that exist outside of Azure. These include Microsoft accounts (earlier known as Live accounts) or accounts from other identity providers and accounts from other organizations.

These identities are not part of your organizational Azure AD; they need to be invited to your tenant for collaboration.

These accounts will be shown as Guest if you look at the User Type value of the user.

Once the collaboration is no longer required, you can delete these accounts from your user list, and the access will be revoked.

Additionally, we need to keep a couple of points in mind while managing users.

You must be a Global Administrator of the tenant to manage the users.

The Global Administrator role is like a supervisor role and should be granted to users who need to manage all aspects of Azure AD.

There are other roles like User Administrator who can manage the users, but this can be used only for managing non-admin accounts.

While creating a username, the name and password are the only mandatory options.

You have two choices with password. First, you can let the system generate a password for the user. The second option is to bring your own password. In both cases, the user will be asked to change the password during the first sign-in, and as an administrator, you should be finding a way to securely share the password with the new user.

The commonly used method is to email the new user’s manager.

Even though the users can be deleted, you can restore these users within 30 days from the deletion date.

Now let’s create a new user in Azure directory and see what the necessary steps are;

Creating Users in Azure AD

1. Navigate to the All Users blade inside Azure Active Directory.

2. Once you are in the All Users blade, you can click the New User option.

3. Selecting New User will display a window to input details of the new user you intend to create. You will be presented with two options, Create User and Invite User.

4. Selecting Create new User will help you create a cloud identity that will exist only in Azure directory.

On the other hand, if you select Invite User, you can invite a person from another Azure directory or a person who doesn’t have an Azure AD account (Guest user) via an invitation process.

I will choose Create a new User as our plan is to create a cloud identity user type.

5. Here the User mail, name, and password are the mandatory fields. You can fill in the

fields User principal Name (guest email), Display Name, Department, Job Title, Contact Info, Profile Picture, etc., if you’d like; they are optional. In this graphic, you can see that we have left Password as “Auto-generate password,” which means that the system will generate the password for the user. You can see the password by enabling the Show Password option.

Clicking on Properties you are faced with identity fields of the new user that need to be filled as shown but are not mandatory.

6. Since we have not filled all the mandatory fields, if we click Review+ Create the user, within a couple of seconds, you will get a notification that the validation failed, and all the required information need to be provided.

7. Going back to the basics page and complete the entire mandatory field and then confirm validation on Review+ create slide you’ll be notified of the success of the operation as the below example.

Anyhow, your responsibility does not stop here; in your daily tasks you will be asked to delete users when someone leaves the organization, modify user attributes when they move to a different department, or change their location. To give you the idea of how to delete and modify users, let’s head to the next section.

Categories
Let's talk about Cloud Microsoft for Organisations

Cloud Computing ?? Perche??

Il cloud computing oramai fa parte della tecnologia dell’informazione (IT) da oltre 20 anni. Durante quel periodo, si è evoluto in una complessa raccolta di servizi informatici e modelli computistici residenti nello cloud. Prima di iniziare il processo di migrare le tue risorse informatiche nello cloud, è importante comprendere i concetti, le offerte e i servizi che cloud ci mette a disposizione. Ci sono molte ragioni vantaggiose per passare al cloud, ma uno dei vantaggi principali è la rimozione di alcuni grattacapi informatici dalla tua azienda. Il cloud ci consente di sfruttare l’infrastruttura e usufruire dei servizi offerti dai fornitori di servizi cloud, semplificando il mantenimento delle nostre applicazioni e gruppi di lavoro. Inoltre abbiamo anche il vantaggio che il fornitore ci regoli con il salvataggio dei volumi di lavoro, backup dei dati garantendo che le applicazioni possano essere immuni a disastri hardware e software e altri problemi di natura tecnica. Allocare i nostri dati e le nostre applicazioni nello cloud è spesso più conveniente rispetto a un investimento in una nostra infrastruttura informatica privata.

Una volta deciso di provare e a valutare tutte le offerte che Azure cloud ci mette a disposizione, è necessario comprendere i diversi modelli di cloud offerti e qual è la scelta giusta da fare. È inoltre necessario comprendere i diversi tipi di servizi che risiedono nello cloud valutando i vantaggi e gli svantaggi di ciascuno.

Il concetto di cloud computing è un po’ più complesso di quanto molti credano. Molte persone credono che passare e migrare le risorse informatiche nello cloud significhi non dover gestire alcuna infrastruttura o sistema IT, ma non è vero. Che tu stia operando dalla tua piattaforma informatica o amministrando i volumi di lavoro nello cloud, sarai sempre responsabile di almeno una parte della tua applicazione o sistema computabile. Puoi sorprenderti sapendo che il cloud offre diversi modelli di gestione e uno di questi e il modello ibrido il quale consente di continuare a utilizzare sia la tua infrastruttura informatica locale, sia il mantenimento di certi volumi di lavoro nello cloud. Puoi persino utilizzare il cloud in scenari in cui sei completamente disconnesso da Internet!

Il modello di condivisione delle responsabilità tra il fornitore dei servizi cloud e l’utente !!

Prendiamo un esempio, consideriamo un tipico scenario in cui sei il gestore di un infrastruttura informatica locale e dove amministri un’applicazione utilizzata da più persone in un’azienda. Per poter allocare l’applicazione, abbiamo prima bisogno di alcuni computer che eseguono il software. A seconda della complessità dell’applicazione, potremmo anche aver bisogno di un server web, un server di database e così via. Abbiamo anche bisogno di connettere tutti questi computer alla nostra rete network e ciò richiede che disponiamo di dispositivi di rete come router, ripetitori, cavi di rete e così via. Tutta questa infrastruttura non si gestirà da sola, abbiamo bisogno quindi anche di un dipartimento IT, personale di supporto, amministratori di database e web e professionisti di rete. Adesso una volta che la nostra applicazione è attiva e funzionante, saremmo responsabili della risoluzione dei problemi riguarda l’applicazione e la correzione di tali problemi. Di giorno o di notte, probabilmente avremmo bisogno di qualcuno disponibile per entrare in azione se le cose vanno male saranno veri soldi da spendere.

Non solo questa è un’enorme responsabilità, ma comporta anche un grande costo… sopratutto costo. Il solo costo dei dispositivi hardware può essere enorme, aggiungi a questi le spese del libro paga di tutti i dipendenti di cui hai bisogno e hai a che fare con una montagna di costi. Questo tipo di scenario è esattamente il motivo per cui molte aziende stanno passando al cloud. Quando passi al cloud, il fornitore di servizi cloud si assume una parte della responsabilità per te. Ad esempio, utilizzando computer virtuali nello cloud invece di computer server nei nostri datacenter aziendali, possiamo spostare il fardello della responsabilità della gestione dei computer al provider cloud. Pero in questo caso comunque siamo ancora responsabili del sistema operativo e della nostra applicazione in esecuzione sui computer, fermo restando certi che il provider cloud si assume la responsabilità di tutto il resto.

A seconda del tipo di servizio cloud che si sceglie, potremmo essere in grado di trasferire ancora più responsabilità al cloud. Ad esempio, se scegliamo di utilizzare uno dei servizi database offerto dal nostro fornitore di servizi cloud, potremmo essere in grado di trasferire la responsabilità della configurazione e delle prestazioni dei server di database al fornitore di servizi cloud, risparmiando denaro e tempo. Quando passi al cloud una certa responsabilità dei tuoi volumi di lavoro. La quantità di responsabilità che trasferisci al fornitore dipende dal tipo di servizio cloud che stai utilizzando, rimanendo sicuri che una parte della responsabilità per qualsiasi implementazione cloud è sempre condivisa tra te e il tuo provider cloud.

Categories
Let's talk about Cloud Microsoft for Organisations

Come si differenziano Azure Active Directory rispetto ai Servizi di Active Directory

Azure AD è la prossima evoluzione nella gestione delle identità. Porta l’identità a un livello superiore basandosi su Servizi di dominio Active Directory e fornisce un’identità come servizio (IDaaS) fornendo lo stesso livello di sicurezza e gestione degli accessi al cloud.

Quindi la piattaforma si sposta!! Non più nei data server collocati nella tua organizzazione ma impiantati nello Cloud Azure.

Proprio come con AD DS, Azure AD è un database di utenti che può essere usato per concedere l’accesso a tutti i tuoi sistemi.

È importante comprendere che si tratta di un database completamente separato, archiviato all’interno di Azure e pertanto l’hardware e il software sottostanti che lo alimentano sono interamente gestiti da Azure, quindi IDaas (Identity as a Service), in Italiano Gestione delle Identità Come Servizio offerto proprio da Azure Cloud.

Di solito, in un data center locale che ospiti nella tua azienda, il tuo amministratore tecnico sarà responsabile della creazione di server directory per ospitare e gestire i Servizi di dominio Active Directory per gestire le identità.  E come tale, amministratore o architetto informatico di turno, dovrà considerare quanti server sono necessari, quali specifiche tecniche dovrebbero avere i server per supportare il carico di lavoro e resilienza, per garantire che il sistema sia sempre disponibile.

Se il tuo sistema di identità fallisce a causa di un guasto hardware l’accesso a tutti i tuoi sistemi verrà bloccato.

Azure AD è un servizio gestito e Microsoft invece garantisce l’integrità, la sicurezza e la resilienza della piattaforma per te.

Mentre AD DS protegge i dispositivi aggiunti al tuo data center, Azure AD protegge i sistemi basati su cloud come le app Web. Con le app Web di Azure ad esempio, gli utenti possono autenticarsi su Internet, ovvero su reti pubbliche, anziché su reti interne.

Pertanto, anche i protocolli utilizzati devono essere diversi:

NTLM e Kerberos utilizzati nei Servizi di Active Directory nel tuo data center. Invece per quanto riguarda ad Azure Cloud devono essere utilizzati i protocolli Web tradizionali, ovvero HyperText Transfer Protocol Secure (HTTPS), come illustrato nel diagramma seguente:

Azure AD si integra anche con altri servizi come Microsoft 365.

Se ti registri a Microsoft 365, verrà creato un Account Utente per te in Azure AD per gestire le tue identità. Questo stesso “Account Utente” può essere utilizzato anche per gestire le tue sottoscrizioni ad Azure e le app che crei al loro interno.

Come si può ben vedere Azure AD è nettamente separato da AD DS, ovvero sono database completamente differenti.

Tuttavia, puoi collegare e sincronizzare Azure AD e il servizio di dominio Active Directory Aziendale, estendendo in modo efficace la tua directory interna con quella nello cloud. Tratteremo questo aspetto in modo più dettagliato in seguito, ma per ora è necessario tenere presente che sebbene diversi AD DS e Azure AD basato su cloud possono essere connessi tra loro.

Categories
Let's talk about Cloud Microsoft for Organisations

Perché dell Active Directory?

Facciamo un passo indietro e consideriamo uno scenario semplice: quello di un sito di e-commerce. Prima di poter ordinare qualcosa, devi registrarti su quel sito Web e fornire alcuni dettagli base: un nome di accesso, un’e-mail, una password e così via.

Un tipico sito Web, come quello mostrato nel diagramma seguente, memorizza i tuoi dati in un database, ma non sei il solo che ha la necessita’ di accedere a quel sito.

Anche gli amministratori vorranno accedere ed elaborare gli ordini che tu hai fatto.

Quindi, dobbiamo assicurarci che clienti come te non ottengano questo livello di accesso. Continuando ancora c’e la necessita’ di registrare anche gli amministratori per fare il loro lavoro. Dicendo questo, tutto si traduce nell bisogno di sapere chi ha accesso a cosa e garantire che agli utenti venga concesso il giusto tipo d’ accesso, chi come cliente e altri come amministratori, come nell’esempio mostrato nel diagramma qui sotto;

Lo stesso è valido anche per un database aziendale. Ad esempio, l’azienda per cui lavori deve fornire l’accesso a vari sistemi interni: buste paga, marketing, vendite, condivisioni dei file aziendali, e-mail e così via.

Ogni applicazione avrà il proprio set di requisiti sicurezza e gli utenti o nell nostro caso gli impiegati potrebbero aver bisogno di accedere a più sistemi.

Per gli utenti aziendali, Microsoft ha introdotto Active Directory Domain Services (AD DS), un Server sistema di gestione delle identità, che consente alle aziende di gestire i database degli utenti in modo sicuro e ben organizzato.

Agli utenti di un Active Directory viene concesso l’accesso ad altri sistemi (a condizione che lo supportino) da un singolo database utente. Microsoft AD DS si occupa della complessità e della sicurezza della gestione degli utenti. Vediamo l’esempio mostrato nell seguente schema:

Da un singolo account, gli amministratori Informatici possono fornire l’accesso a condivisioni dei file, sistemi di posta elettronica e persino applicazioni Web, a condizione che tali sistemi siano integrati con AD.

In genere, ciò si ottiene aggiungendo al Server Active directory il dispositivo che ospita l’applicazione, sia esso un server di posta elettronica, un server Web o un file server;

Quindi il dispositivo ospite diventa parte della rete. In seguito questo argomento lo prenderemo di nuovo.

A tal fine il Active Directory server non gestisce solo gli account degli utenti ma anche gli account dei computer. In questo modo, il meccanismo di identità è un sistema chiuso, ovvero solo i computer e gli utenti interni che fanno parte hanno accesso.

Sebbene i meccanismi di accesso da una rete esterna remota, (diciamo da internet), siano già stati sviluppati, il meccanismo rimane lo stesso, quello di integrare la rete esterna con la rete interna, isolando l’intero sistema attraverso tecnologie e protocolli di rete.

Microsoft AD DS utilizza protocolli specifici per gestire la sicurezza della rete, dei dispositivi e degli utenti che ne fanno parte e il modo in cui queste identità comunicano tra di loro.

Questi protocolli sono;

Kerberos e NTLAN (Nuove Tecnologie per l’Area Network Locale).


Microsoft AD DS è oggi uno standard comune usato da molte organizzazioni nella gestione delle identità. Come discusso, è costruito attorno al concetto di un sistema chiuso, i componenti sono tutti strettamente integrati facendo rispettare il loro requisito di essere “uniti e integrati in un circuito chiuso