Categories
Let's talk about Cloud Microsoft for Organisations

Understanding and Managing Storage

We will explore the different types of storage accounts available to Azure, the different access tiers, disk storage, and the varying redundancy options. We will create a storage account, set up file shares and blob storage, and use Azure Storage Explorer to manage storage accounts. We will also explore how to import and export data from Azure.

Understanding Azure storage accounts

Azure offers a variety of services that can be utilized for storage; these can vary from database options to messaging systems, to files. Azure has identified four core types of services and integrated these into a single service named Azure Storage.

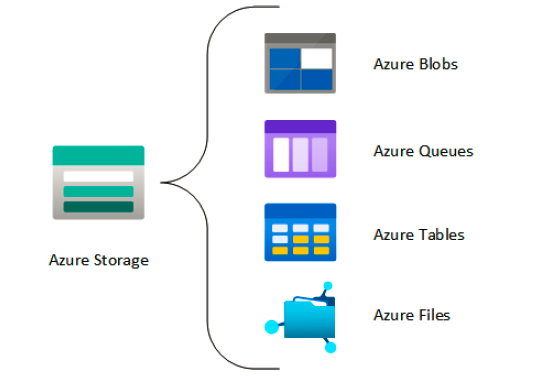
These are identified as Azure Blobs, Azure Files, Azure Queues, and Azure Tables under an Azure storage account. A storage account may contain several data services in a combination of the ones described previously and stored collectively in a grouped service.
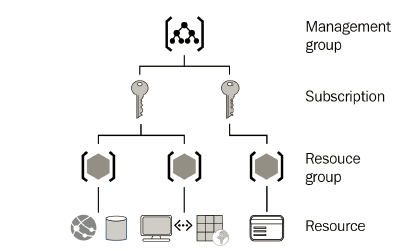
Various types of data—such as files, documents, datasets, blobs, and virtual hard disks (VHDs)—can be stored in the storage account, and most will be accommodated by the defined structure. The following screenshot illustrates the different storage services associated with a storage account:

Types of storage accounts


Azure Storage currently offers several different types of storage accounts, as detailed in this section. There are various components to consider when choosing the correct type of account, these being the following:

  • Type of storage account (consider the service required)
  • Redundancy
  • Intended usage
  • Performance
  • Replication
  • Security
  • Limitations
    Let’s see in detail the different types of storage accounts.
General-purpose version 1 (legacy)

A general-purpose version 1 (GPv1) storage account is the oldest type of storage account. It offers storage for page blobs, block blobs, files, queues, and tables, but it is not always the most cost-effective storage account type.

It is the only storage account type that can be used for the classic deployment model but does not support the latest features, such as access tiers.

This account type is no longer recommended by Microsoft. It is still
generally considered the cheapest of storage options but is highly restricted compared to general-purpose version 2 (GPv2) storage.

Although legacy, these accounts can be upgraded to GPv2 storage. However, you should also consider storage costs as these might
increase as a result of the change.

GPv2

This is a standard storage account and supports blobs, queues, tables, and file shares.
This is the storage account type recommended for most scenarios. It supports locally redundant storage (LRS), geo-redundant storage (GRS), read-access GRS (RA-GRS), zone-redundant storage (ZRS), geo-ZRS (GZRS), and read-access GZRS (RA-GZRS)
redundancy options.

Standard blob storage

Azure Blob storage offers unstructured data storage in the cloud. It can store all kinds of data, such as documents, VHDs, images, and audio files.

There are three types of blobs that you can create. This type of storage is also considered a legacy storage account type and consists of various types of blobs, as outlined here:

  • Page blobs: Blobs that are used for the storage of disks. These blobs are optimized for read and write operations and stored in 512-byte pages. So, when you have a VHD that needs to be stored and attached to your virtual machine (Virtual Machine), you will have to create a page blob. The maximum size of a page blob is 8 tebibytes (TiB).
  • Block blobs: Basically, these cover all the other types of data that you can store in Azure, such as files and documents. The maximum size of a block is 4,000 mebibytes (MiB) and the maximum size for a blob is 190.7 TiB.
  • Append blobs: These blobs are optimized for append operations, basically meaning that data (blocks) is added to the end of a blob. Each block can be of different sizes, up to a maximum of 50,000 blocks. Updating or deleting existing blocks written to the blob is unsupported.

The standard blob storage account offers all the features of StorageV2 accounts, except that it only supports block blobs (and append blobs). Page blobs are not supported.

It offers access tiers that consist of hot, cool, and archive storage, and Microsoft recommends using GPv2 storage instead of standard page
blobs as this is supported without the requirement for limitations. It supports LRS, GRS, and RA-GRS redundancy options.

Example workload types include the following:

  • Backup and archiving functionality
  • Disaster recovery (DR) datasets
  • Media or unstructured data content

Premium block blob storage

Premium storage is used for situations requiring lower latency and higher performance. This is enabled through high-performance hardware associated with the presentation of storage within Azure, such as through solid-state drives (SSDs), and provides faster throughput and input/output operations per second (IOPS) compared to standard storage, which is backed by hard disks (spinning disks).

This storage is typically used for block blobs and append blobs. It supports LRS and ZRS redundancy options.

Example workload types include the following:

  • Workloads requiring fast access and functionality, such as e-commerce applications
  • Large datasets that are constantly added, manipulated, and analyzed, such as internet of things (IoT) applications
  • Artificial intelligence (AI) or machine learning (ML) applications
  • Data transformation workloads
Azure file storage

With Azure Files, you can create file shares in the cloud. You can access your files using the Server Message Block (SMB) protocol, which is an industry standard that can be used on Linux, Windows, and macOS devices.

Azure files can also be mounted as if they were a local drive on these same devices as well, and they can be cached for fast access on Windows Server using Azure File Sync. File shares can be used across multiple machines, which makes them suitable for storing files or data that is accessed from multiple machines, such as tools for development machines, configuration files, or log data.

Azure Files is part of the Azure Storage client libraries and offers an Azure Storage Representational State Transfer application programming interface (REST API) that can be leveraged by developers in their solutions.

Premium file shares storage

Premium storage is used for situations requiring lower latency and higher performance.
Premium file shares are typically used for workloads requiring enterprise-scale or high-performance applications. The service presents storage in the form of SMB or Network File System (NFS) storage.

SMB is typically used for Microsoft Windows-type environments such as Windows Server, whereas NFS is typically used for Linux-based
environments. NFS can only be enabled on premium file shares.

Some differences worth noting when choosing your file-share storage service are IOPS and provisioned storage limitations. GPv2-backed file shares have a limit of 20,000 IOPS and 5 pebibytes (PiB) of provisioned storage, while premium file shares storage offers 100,000 IOPS but only 100 TiB provisioned storage.

Storage access tiers

Blob storage accounts use access tiers to determine how frequently data is accessed. Based on this access tier, you will get billed.

Azure offers three storage access tiers: Hot, Cool, and Archive. Azure also offers configuration options for blob life cycle management,
which we will explore more on the next post

Hot
The hot access tier is most suitable for storing data that is accessed frequently and data that is in active use. For instance, you would store images and style sheets for a website inside the hot access tier.

The storage costs for this tier are higher than for the other access
tiers, but you pay less for accessing files. This is the default access tier for storage.

Cool
The cool access tier is the most suitable for storing data that is not accessed frequently (less than once in 30 days). Compared with the hot access tier, the cool tier has lower storage costs, but you pay more for accessing files. This tier is suitable for storing backups and older content that is not viewed often.

Categories
Let's talk about Cloud Microsoft for Organisations

How to setup and manage Azure cloud budget

Budgets create a logical way for a scope defined in Cost Management to manage cost expenditure on resources. Use these to prevent unexpected expenditures such as runaway costs. Here’s how to create a budget:

Login to Azure home and find out the subscription that you intend to control the expenditure.

  1. Select Budgets from the Cost Management menu, as below;

Click + Add and complete the relevant fields, as well as select a scope for the budget. For the Budget Amount field, assess the chart information on the right to understand expected costs and predict the budget to be implemented. Click Next >. You will note in the following screenshot that I have created already a budget, (budget 1), set at 10£ GBP. This will change depending on the region you billed in: example I reside in UK so my currency is set in GBP.

  1. Next, we will need to define conditions for an alert to be triggered; for instance, 85 % of the defined budget. We can select an action group for notifications (more intelligent notification management can include emails, Short Message Service (SMS), Azure Functions, and Azure Logic Apps), and we can specify an email notification. Select a language for the notification to be delivered in and click Create. The following screenshot provides an overview of the process

You have now seen and learned on how to define and apply budgets in Azure.

Categories
Let's talk about Cloud Microsoft for Organisations

How to manage groups of subscriptions in Azure cloud

If you think of from an organizational perspective, there will be
multiple accounts, and there will be multiple subscriptions meant for different environments and workloads
.

Using management groups, you can logically group subscriptions. This way, management groups offer a new scope above the subscriptions, which can be used for granting access, assigning policies, and analyzing costs.

All access or policies assigned to the management group will be inherited to the subscriptions that are part of the management group.

Management groups enable administrators to do the following:

  • They can logically group subscriptions into different containers.
  • They can apply policies and access a set of subscriptions easily.
  • Cost management can be scoped at the management group level for tracking the costs of multiple subscriptions in a single shot.
  • Budgets can be created at the management group level, which is ideal for teams and projects having multiple subscriptions.

Management groups can be created from the Azure portal, PowerShell, and the CLI. There will be a default management group that will be provisioned along with your tenant called the root management group. All new management groups will be created as children of this root management group.
Creating a management group is a straightforward process you can perform by searching and navigating to management groups in the Azure portal

Two parameters are required while you create a management group. The first one is Management Group ID; this identifier is used to denote the management group when you want to run commands against the management group.

Second, you need to add a display name, which will act like a friendly name for your management group. Whenever you are making PowerShell, Azure CLI, or REST API calls, you will be using the identifier to point to the management group.

*Management Group ID cannot be modified once the management group is created.
To management groups, can be leveraged to apply policies and grant access easily on a larger scope.

Categories
Let's talk about Cloud Microsoft for Organisations

How to manage resources in Azure

Resource Groups

A resource group is a container used for the logical organization of resources in Azure. These resources may be part of the same solution or based on any grouping that you prefer. Some organizations prefer to keep all services that are part of a solution in a single resource group.
For example, say you are hosting a payroll application that has a virtual machine, SQL database, and storage. You can group these resources so that you can manage the lifecycle of them together.

Some organizations prefer to keep resources of the same type together, for
example, all virtual machines in a single resource group or all databases in a single resource group. This strategy would help them to manage the access to all virtual machines or databases easily.

Resource groups make it easy to deploy, delete, or update resources in bulk. Instead of performing operations on these resources one by one, you could directly perform the action on the resource group, and all resources that are part of the resource group are updated with the action.

Assume you have 135 services deployed to your subscription and now your management is asking you to delete these 135 services. You could select all services from the portal or write a script in PS/CLI to delete the resources. Another easier workaround is to delete the resource group so that all the resources are deleted. This is not an action that is
recommended in a production environment, as this delete action cannot be reversed, and the deleted services cannot be recovered. It’s recommended that you are cautious and vigilant before deleting a resource group.

A resource group contains the metadata about the resources that are part of the resource group. You can have resources from different regions be part of the same resource group; however, the metadata about these resources will be stored in the region of the resource group.

An example is if the location of your resource group is East US and you have a couple of VMs from West US that are part of the resource group. Another is if the East US region is facing an outage and you are making any changes to the VM. Even though the VMs are from West US, the metadata cannot be updated as the East US (region of the resource group)
is facing an outage.
Now let’s see how you can manage (create, list, open, and delete) a resource group from the Azure portal

Creating a Resource Group from the Azure Portal

  1. Sign in to the Azure portal.
  2. Select Resource Groups and click Create.
  1. Input the following values:
    Subscription: Select your subscription.
    Resource Group
    : Enter a name for the new resource group.
    Region: Select the region for the resource group such as East US, India Central, UK South, etc.
  1. Clicking Review + Create will take you to the validation phase.
  2. Once the validation is done, you will see the Create button. Click Create, and your resource group will be created.

Deleting Resource Groups from the Azure Portal

  1. Sign in to the Azure portal.
  2. Select the Resource Groups blade, and you will be able to list all resource groups in your subscription.
  3. Open the resource group you would like to delete. Once you are inside the resource group, you will be able to see the Delete Resource Group option that can be used to delete the resource group. You need to enter the name of the resource group to confirm the deletion as this action cannot be undone.

So far, we used the Azure portal to perform the management actions. You can also use Azure PowerShell or the Azure CLI to perform the same tasks. As of now, you can delete only one resource group at a time from the Azure portal. By using scripting, you can perform the management actions in bulk.

Categories
Let's talk about Cloud Microsoft for Organisations

How to manage costs in Azure Cloud


Controlling your cloud expenditure is part of cloud governance, and you need tools to properly see the breakdown of the costs and track them. Azure Cost Management is the go-to tool for performing your billing administrative tasks and for monitoring costs.

Opening Cost Management in the Azure portal will show some charts that explain your cloud spending.

Check Cost Management on Azure home as below and open the blade as below; This will land to the overview page where you can setup your account, report on analyse and trend, control and optimise the spending.

Additionally, Azure Cost Management provides the following features:

  • Users can create budgets, and alerts can be triggered if the threshold is crossed.
  • Usage reports can be exported to a storage account for auditing purposes based on a schedule.
  • You can forecast future costs using predictive analytics.
  • You can ingest your AWS costs and analyze them on Azure.
  • Azure Cost Management can be integrated with Azure Advisor.
  • You can track Azure reservation usage and calculate potential savings.
  • You can track Azure Hybrid Benefit discounts.
  • Azure Cost Management has richer APIs that can be integrated with third-party tools for visualization.
  • Azure Cost Management has a Power BI connector for the easy export of data to Power BI dashboards (supported for EA/MCA customers only).

Administrators can leverage all the aforementioned features to improve the cost monitoring and cost optimization.

But let’s see some of the features that you can use to plan and control your cloud expenditure.

Plan and Control Expenses

If you navigate to Cost Management + Billing ➢ Cost Management in the Azure portal, you will see the tools that are required for planning and controlling your expenses. We are primarily focusing on the highlighted tools as shown.

Let’s take a closer look at each of these tools.

Cost Analysis This blade can be used for viewing and analyzing your cloud spending.
There are different views (built-in views and custom views can be created), filters, and grouping options available in Cost Analysis that can be leveraged by administrators to perform a deep analysis of the cost. You can also decide the granularity and the time frame
for analysis. Time frame options include monthly, quarterly, yearly, or even custom for customization.

You can export your Azure usage data to a storage account based on a schedule. These CSV files can be leveraged by third-party
analytics and visualization tools for creating dashboards.

Cost Alerts You can configure alerts that will notify administrators if the cost crosses the set threshold.

Budgets Every project has budget constraints, and the Budgets feature in Cost Management will help organizations to meet this financial accountability. You can set up thresholds and trigger alerts using action groups when the usage exceeds a certain percentage of the budget set. You can also integrate budgets with automation workflows to shut down VMs automatically when the spending exceeds a certain limit.

Plan and Control Expenses If you navigate to Cost Management + Billing ➢ Cost Management in the Azure portal, you will see the tools that are required for planning and controlling your expenses.

Advisor Recommendations These recommendations are generated from Azure Advisor based on your usage. Azure Advisor uses machine learning on your usage to generate these recommendations. These recommendations include reservation purchases and downsizing underutilized VMs. You can directly remediate these issues and make your cloud more cost-effective.

Incorporating these tools in your environment can improve the cost planning and optimization.

Cost Saving Techniques

There are a set of services or techniques administrators can use to get the best out of their infrastructure.

Reserved instances (RIs)– or reservations, can be used by customers to save costs on selected services. Selected services include Azure Virtual Machine, SQL Database, Azure Cosmos DB, Azure SQL Managed Instance, and other services. You can pay for a one-year or three-year term for these services upfront or in a monthly manner.
For certain services, Microsoft has extended the term to five years. Purchasing reservations will reduce the costs up to 72 percent over the Pay As You Go rates.

Azure Hybrid – on this technique the benefits are, that you can bring your own Windows Server or SQL Server or Linux licenses to use on Azure Virtual Machine, Azure SQL Database, and Azure Managed Instances. If you have already purchased licenses with software assurance, you
don’t have to pay for these licenses in Azure. Combining RI and Azure Hybrid Benefit can increase the savings.

Azure Credits and Dev/Test Subscriptions It’s always recommended that you choose the right subscription to host your workloads. If you are testing or developing solutions, there are subscriptions with free credit that can be utilized rather than deploying your solutions in a production subscription and paying invoices.

For example, if you are a Visual Studio Subscriber (Enterprise/Professional), you can get a subscription with free credits that gets renewed every month. If you have an EA, then you can use an EA Dev/
Test
subscription for testing and development. EA Dev/Test rates are cheaper than the production EA subscription. Similarly, Pay As You Go customers can purchase PAYG Dev/Test for development and testing purposes.

Azure Regions – The prices of Azure services vary from region to region; you can always deploy to a region that has a lower cost to save your spending. However, make sure that this decision is not affecting the performance or data residency requirements (if there are any).

Budgets we already have seen about budgets in the “Plan and Control Expenses” section above.
Having a budget will help you get notified whenever you are crossing the limits assigned to you; you can also take necessary actions to remediate this. Budgets plays a crucial role in accounting and cost tracking.

Pricing Calculator – In Azure, there are hundreds of services, and each service has several pricing tiers. It’s not possible for an administrator or an architect to remember all these pricing and calculate them. Using the Pricing Calculator, you can estimate the cost of any service in Azure. You can export it to Excel to share with your stakeholders or
directly share the link for estimation.

The Pricing Calculator can be accessed here:
https://azure.microsoft.com/en-in/
pricing/calculator

Categories
Let's talk about Cloud Microsoft for Organisations

Cloud governance and compliance

As organizations migrate to the cloud, there can be a lot of
confusion and misconceptions. Cloud governance and compliance
is all about a set of rules that you need to comply with, while you are creating, migrating, or managing resources in the cloud. These rules vary from organization to organization.

For example, a government organization may have strict rules
that they need to follow when they run a business in the cloud. On the other hand, a private company will have liberal rules compared to the government one. Ideally, these rules are no different than the ones you have on-premises;
the only difference is that in the cloud you will be using Microsoft Azure as the platform instead of your on-premises servers.
A lack of rules or controls will create issues with your data privacy, security, and cost, as well as efficiency.

With on-premises, you controlled the entire infrastructure, and the perimeter was secured using firewalls and other security devices. In the cloud, you won’t have complete control over the network, so you need to be aware of the vulnerabilities and the best practices or offerings provided by Azure to resolve them.

Common rules that are followed in organizations are related to data residency, compliance policies like PCI-DSS if you are dealing with customer credit card information, budgeting for cost optimization, and security services to ensure that there are no vulnerabilities that
can be exploited by hackers.

Compliance and governance cannot be achieved in a single day;
this is a continuous process. The policies and procedures need to be tweaked and evolved as you notice room for improvement. Also, sometimes you need to expand the rules to accommodate
new services.

Concisely, cloud compliance is all about setting up rules by which you will be continuously monitoring and amending relevant controls for cost optimization, improving efficiency, and eradicating security risks.

How to get a cloud subscription in Microsoft Azure

You can get a Microsoft Azure subscription from multiple channels. You might not be eligible for all the subscriptions listed here; the eligibility is dependent on the terms and conditions of the respective
offers. Here below I have numbered these channels.

Enterprise Agreements (EAs). EA customers will sign an agreement with Microsoft or Microsoft Partners and make an up-front
monetary commitment to Azure. All usage incurred will be charged against the monetary commitment; when the commitment expires, the customer will start receiving invoices. You can make the prepayment again
and continue using the services. The advantage of using EAs is that they offer more discounts than other offers as the customer is paying the amount up front.

If your organization is looking for massive deployments in Azure and requires 99.95 percent monthly SLA, then an EA is the best option.

Web Direct. In web direct, customers can directly go to the Azure website and purchase a new subscription. If you prefer, you can sign up for a Free Trial subscription and upgrade if you are interested in continuing the service. You won’t be charged until you upgrade the subscription from Free Trial to Pay-As-You-Go. Once you upgrade, as the name implies, you will be charged as per the charges mentioned in the Azure public-facing
documents. There are no discounts available for you in this case, and you will require a credit card to sign up for this subscription.

Reseller Using the Open Licensing program, customers can buy tokens from resellers and sign up for an Azure-in-Open subscription. As a customer, you can buy a token for any amount you need; the charges incurred will be taken from this amount. When the amount is exhausted, you need to buy a new token and refill your account to avoid service
interruption. This works like a prepaid cellular plan.

Microsoft Partners. You can purchase an Azure subscription from partners, and they can help you with the cloud transformation. The partners will be your first point of contact for any Azure-related concerns as the agreement is signed between the partner and the customer.

These types of subscriptions are called cloud solution provider (CSP) subscriptions, and every month you’ll receive an invoice from your partner based on your usage.
Microsoft doesn’t play any role in the invoice generation as you don’t have any direct billing relationship with Microsoft. CSP subscriptions offer more discounts compared to the Pay-As-You-Go subscriptions and are ideal for organizations that don’t have the budget to make the up-front
monetary commitment for an EA.

Subscription Metering

All offers provided by Azure are meant for unique needs and requirements. For people who want to test the services there is a Free Trial, for students there is Azure for Students, and finally for enterprise deployments we have different paid subscription offers like EA, Pay As You Go, etc., which provide service level agreements (SLAs). The most commonly used
subscription types are these:

Free subscription
Pay-As-You-Go
Enterprise Agreement
Azure for Students

With Azure Free Subscription You can get a $200 credit to spend on any Azure service for the first 30 days. You have to upgrade your Free Trial if you exhaust your credits or when you complete the trial period (whichever happens first).

Along with the credit, you will get selected popular Azure services free for the first 12 months and 25+ services always free. However, this benefit will be applied only if you upgrade to a paid subscription. Signing up for a Free Trial will require a credit card; this is only for the
verification purposes, and you will not be charged unless you upgrade to the paid subscription.

Azure Pay-As-You-Go Subscription Once you upgrade your Free Trial subscription, your subscription will be converted to a Pay-As-You-Go(PAYG) subscription. In PAYG, you will be receiving invoices monthly based on your consumption. However, this will not be from the first to the last of the month; the billing cycle is dependent on what
date you started the PAYG usage. PAYG is ideal for individuals to small businesses; even some large organizations use PAYG. However, there are no discounts applied like with EAs.


Azure Enterprise Agreement Customers can buy cloud services and software licenses under one single agreement. These customers are also eligible for discounts on services, licenses, and software assurance. The targeted audience for this is enterprise organizations.
Customers need to pay the cost upfront to Microsoft as a monetary commitment, and the consumption will be deducted from this prepayment.

Azure for Students As the name suggests, this subscription is ideal for students who want test or develop solutions in Azure for learning purposes. Students will receive $100 as a credit that is valid for 12 months. Along with the credit, there will be free services that users can leverage. Students need to verify their student status using a university email address to activate this subscription. Also, Azure for Students doesn’t require a
credit card.

Categories
Let's talk about Cloud Microsoft for Organisations

Managing Multiple Directories

Each tenant represents an organization, and it is a fully independent resource. Every tenant that you create is logically separated from other tenants that you manage in a multi-tenant environment. Even if you are the common administrator for all these tenants, there
will not be any parent-child relationship between these tenants or directories.

Resource independence, administrative independence, and synchronization independence are there between the tenants.

Resource independence is when you create or delete a resource in one tenant; this action will have no impact on any other resource in another tenant.

However, there is a small exception that we discussed in the case of cloud identities from external directories . By default,
Microsoft Azure Entra directory doesn’t delete Guest users when they are deleted from their home tenant; however, we can set this up manually.

Administrative independence is when a non-admin user (say the user’s name is John) of tenant A creates a new tenant, say tenant B.

  • John will be the Global Administrator of the tenant B as he created the new tenant. The user will be added as a user from external Directory. Here it says external tenant directory, because John is not from tenant B but from tenant A.
  • Administrators of tenant A have no control over tenant B. If the users of tenant A need to access or manage tenant B, then John must invite these users to tenant B and give the necessary role. One thing to note here is that if the admins of tenant A takeover John’s account, they can access tenant B.
  • Adding or removing an admin role in one tenant will not affect the role of the user in the other tenant. Here we’re not removing the user; we are adding or removing the Azure directory roles, which will have no impact on the other tenant, and all roles the user has in the other tenant will be retained.
  • When it comes to synchronization independence, you can set up independent synchronization on each Azure Directories.
Categories
Let's talk about Cloud Microsoft for Organisations

How to implement Self- Service Password reset on Microsoft Azure


If you have worked at an IT help desk, you know most of the calls are for user password reset. Self-service password reset (SSPR) allows users to reset their passwords using a set of authentication methods set by the cloud administrators.

Self-service password reset is always enabled to administrators to avoid lock-out scenarios. Admins need to use two authentication methods for password reset.

Enabling Self-Service Password Reset

Cloud administrators need to enable SSPR options for users or groups as this option is not enabled by default. To enable this feature, you need to have the Global Administrator role in the tenant.
SSPR can be enabled from Azure Portal >Microsoft Entra ID >Default Directory >Password Reset.


SSPR provides three options:

1)None: SSPR is not enabled.
2)Selected: SSPR is enabled for selected groups.
3)All: SSPR is enabled for all users in the tenant.

Once SSPR is enabled, users need to register for SSPR. Azure will automatically redirect users to the registration page on first sign-in
after SSPR is enabled. Users can always navigate
to https://aka.ms/ssprsetup to set up their authentication methods or to change them in the future.

For example, you might have registered with one phone number when you
enrolled for SSPR, but you changed your phone number. In this case, you can change it by going to the SSPR setup page.

Registered users can always reset the password from the sign-in
page by clicking “Can’t access your account?” as shown here below

It is not necessary that you navigate to Azure Portal to click “Can’t access your account?”; you can navigate to any sign-in page that uses Azure AD login like Office 365, Dynamic 365, SharePoint, etc.
Users can also navigate to the reset page directly by going to https://aka.ms/sspr.
This is an alias for the following:
https://passwordreset.microsoftonline.com
Now that you are familiar with SSPR setup, let’s see what authentication methods are available for the users and how administrators can control these methods.

Authentication Methods

The administrator can choose the number of authentication methods required to reset the password and the number of methods available for users.

For a successful reset operation, you require at least one authentication method. Nevertheless, it is always better to have a secondary method. For example, if you set up SSPR with an email method, and if the user has no email access, then the user will not be able to reset the password.

Here, it is better to have a second option like a mobile phone so that the user can receive the code as a text message and complete the authentication.

Methods available include the following:

  • Email notification
  • Text message to mobile phone
  • Text message to office phone
  • Mobile app notification
  • Mobile app code
  • Security questions

In the case of security questions, the administrator can decide how many questions need to be registered and how many of them need to be answered to reset the password. Nonetheless, security questions are considered less secure as the answers to these questions can be guessed if the intruder or hacker knows the user personally. Attackers can also collect answers for these questions via social engineering.

Authentication methods can be configured from Azure Portal ➢ Microsoft Entra ID ➢ Password Reset ➢ Authentication Methods

So far, we concentrated on a single-tenant environment; in real-world
scenarios there will be different tenants, and admins are responsible for the management of these tenants. Let’s see on the next post why we need multiple directories and what benefits it provides.

Categories
Let's talk about Cloud Microsoft for Organisations

Providing access to resources by assigning the custom RBAC role

In this post we are going to assign access on the resource group level with an account that has owner permissions on the resource group level:

First:

  1. Navigate to the Azure portal by opening a web browser and going to https://portal.azure.com.
  2. Select Resource groups on the left, which will show all the current resource groups:
  3. Select one of your resource groups; if you do not have one yet, you need to create one in any region you want and call it Az-104. In this scenario, I will use one of my resource groups, also called Az-104:

4. Next, go to the Access control (IAM) section, click on Add, and select Add role assignment:

  1. A new blade opens up; under Role, search for the custom role we created called IT support – Restart VMs only. Under Assign access to, leave it as User, group, or service principal and select a USER you may have created previously and click save.

That’s it – we have now successfully created and assigned a custom RBAC role to a user of your wish.
The final step is to validate the role assignment.

Confirming the role assignment steps

Now that we have assigned a role to a user, let’s go ahead and confirm that it’s working as expected:

  1. Navigate to the Azure portal by opening a web browser and browsing to https://portal.azure.com (you will need to sign in as the user that you assigned your custom role to).
  2. Select All resources on the left, which will show all the current resource groups:

3. You will be able to see all the VMs listed that are part of the specified resource group:

  1. Select a started VM that is available – in my case, this will be prod-vm1 – and see if you can stop the VM:
  1. A pop-up error message will display Failed to stop virtual machine, and that is how we can confirm our custom RBAC role, which denies a user stopping a VM that is working as expected and that only restarting the VM is allowed:

In this post, we looked at how to assign a custom RBAC role via the Azure portal and confirmed that the custom role is applied and working as expected.

Interpreting access assignments

There are a few tips we can provide when interpreting access assignments. First off, you need to understand the scope of the assignment – that is, is it at the management group, subscription group, resource group, or resource level?
Next, you can have a look at the role rules; in order to do this, you need to do the following:

  1. Navigate to the Azure portal by opening a web browser and browsing to https://portal.azure.com.
  2. Select Resource groups on the left, which will show all the current resource groups, and select a resource group in your subscription (in my case, it will be ”Iviewcommunication”).

3.Under Access control (IAM), choose Role assignments and select a role you want to have a look at in detail:

In my case, I’m going to select the owner role:

On the next slice we gonna see all the permissions that the owner role can perform. I just have highlighted the most important among the others.

Click on JSON; now, we will be able to view what the role has access to and also what actions are not allowed:

In this post, we discussed what custom roles are, how they work within Azure, and the different scope levels to which RBAC can be applied. We also created a custom RBAC role that only allows a user to restart a VM and not stop it. Finally, we went over how to interpret RBAC role assignments within the Azure portal.

Categories
Let's talk about Cloud Microsoft for Organisations

Managing Role-Based Access Control

This post is focused on managing Role-Based Access Control (RBAC), and we’ll see what RBAC is and how to apply it at the different scope levels. We will also cover how to create and assign custom RBAC roles and how to interpret RBAC roles within the Azure portal.

In brief, the following topics will be covered in this chapter:

  • Creating a custom role
  • Providing access to resources by assigning roles at different scopes
  • Interpreting access assignments.

Creating a custom RBAC role

RBAC is a general term used for restricting access to users, based on a role. It works on the Just Enough Access (JEA) concept where a specific user/group will be provided minimum access to perform their specific job on a specific resource. Custom roles can only be created and updated by a user who has the following role assigned: Microsoft. Authorization/roleDefinitions/write permissions.

When it comes to RBAC, it is very important to understand how and where it is applied. Azure RBAC can be applied to the following security principals:

• User

• Group

• Service principal

• Managed identity

Now that we know what security principals support RBAC, the next step is to have a look at role definitions. A role definition is a collection of permissions that can be applied to security principals; however, in Azure, this is referred to as a role. A role is what determines what operations are allowed – for example, read access, write access, or the deletion of resources.

The following are some built-in roles within Azure:

Owner role: This is the role that includes all permissions; you can read, add, and remove resources. You also have the capability to add and remove other users to and from resources as owners or other roles.

Contributor role: This role has the same permission as an owner, except you cannot add or remove additional users to and from resources.

Reader role: This role has the ability to view resources, but cannot amend, add, or remove users or resources.

Moreover, there are multiple built-in roles within Azure, and it is recommended that you have a look at them: https://docs.microsoft.com/en-us/azure/role-based-access-control/built-in-roles.

The next part is to understand scope. Scope is the target resource that you need to assign a role to. In Azure, there are mainly four scope levels that roles can be assigned to:

• Management group

• Subscription

• Resource group

• Resource

The following diagram displays the main scope levels in Azure:

In summary, RBAC consists of three main sections:

Security principal: Selects who is going to have access

Role: Selects what type of access is going to be assigned to the security principal

Scope: Selects the resource that the user and the role will be applied to

Now that we understand built-in RBAC roles within Azure, let’s take a look at custom RBAC roles. Custom RBAC roles can be created if the built-in RBAC roles do not meet specific requirements.

Custom RBAC roles can be created in the following ways:

• The Azure portal

• Azure PowerShell

• The Azure CLI

• The REST API

In this section, we had a look at RBAC in Azure and how it works from a logical perspective.

let’s see how to create a custom role.

Creating a custom role

Let’s go ahead and use the Azure portal to create a custom RBAC role from scratch named IT Support – Restart VMs only, which can only restart virtual machines and deny the startup and shutdown of them:

1. Navigate to the Azure portal by opening a web browser and browsing to https:// portal.azure.com.

2. In the top section search bar, search for and select Subscriptions:

3. Select an active subscription; in my case, this will be the Azure subscription 1 subscription, as seen in the following screenshot and click on it:

4. Next, under the Basics tab, enter the custom role name and description and select the Start from scratch setting under Baseline permissions. Under Custom role name, specify IT support – Restart VMs only; it is also best practice to provide a brief description in the Description field when creating resources in Azure:

5. Next, we need to specify the permissions. Click on the Add permissions button, and in the search bar that pops up, search for Virtual machines and select Microsoft Classic Compute:

6. A new blade will pop up with all the compute permissions. Scroll all the way down to Microsoft.Compute/virtualMachines and select Read: Get Virtual Machine and Other: Restart Virtual Machine, and then click Add:

7. Next, we need to exclude this role from starting and shutting down virtual machines. Click on the Exclude permissions button and search for Virtual machines again, and then select Microsoft Compute:

You will notice that the new role now has the following permission types:

  • Action: Read the Virtual Machine (VM).
  • Action: Restart the VM.
  • NotAction: Start the VM.
  • NotAction: Shut down the VM.

Click on Next.

10. Next, we have Assignable scopes, where we can choose where this custom role will be available for assignment. In this scenario, we are going to leave it at the default subscription level that was automatically added and then click on Next:

11. Next, we have the JSON tab, which shows the permissions for the new role in JSON format; we also have the ability to download the JSON code. For now, let’s click on Next:

12. The last tab is the Review + update tab, which is a summary of our configuration; click on Create:

13. A new pop-up window will appear, stating that the new custom role has been created and that we can start assigning the role as soon as replication has taken place, which is usually around 5 minutes or less.

In this section, we have created a custom RBAC role via the Azure portal from scratch, which only allows a VM to be restarted and blocks any start or shutdown attempts on a VM.